Showing posts with label dessert. Show all posts

Sunday, December 7, 2014

Raspberry Almond Thumbprint Cookies

For my favorite cousin, Cindy!

I don't know about you but I am heavy into holiday baking season.  Yes, it's only the 7th of December but my sheet pans have gotten a serious workout these last few weeks.  I've also started a new extreme sport: baking w/ a toddler.  Apparently, I have serious thrill seeking issues.

Baking w/ an almost three year old (how did that even happen?!) is like baking w/ say, the Tasmanian Devil.  Did anyone else have those really obnoxious t-shirts growing up?

......

Moving along.  These cookies take a bit of preparation and some delayed gratification is involved, which, let's face it - is not necessarily a toddler's strong suit.  Either way, the payoff for these amazing cookies is totally worth it.  Give yourself a few hours (at least) before you need these, they require some time to chill out in the fridge before baking.

We're headed down to Florida in February and I cannot wait to get in the kitchen with these girls and bake some more of these awesome cookies.

No, I don't actually have a picture of the cookies.
That would make entirely too much sense and take entirely too much foresight.

What are you baking for the holidays?

Raspberry Almond Thumbprint Cookies

Adapted from this recipe (I don't think they need the glaze and I like my technique better so you're not killing yourself working w/ hard, cold dough which is more difficult to form)

makes about 30 cookies

1 c. unsalted butter, softened (2 sticks)
1/2 c. granulated sugar
1 tsp. vanilla extract (or vanilla bean paste)
1/2 tsp. almond extract
1/2 tsp. salt
2 c. plus 2 tbsp. AP flour (sifted)
1/2 c. raspberry jam

Begin by creaming the butter and sugar until light a fluffy.  Add in extracts and salt, blend until combined.  Add in flour in 1/2 cup additions until combined but be careful not to over-mix or else you end up with tough dough.

Using a 1 oz. cookie scoop (or a rounded tablespoon), scoop out portions of dough and roll in to balls, place on a cookie sheet lined with a silicone baking mat or parchment paper.  Press thumb lightly to flatten the balls and create an indentation in the dough for the jam later.  There will be cracking which doesn't bother me but if you'd rather have perfectly uniform cookies, the dough can easily be smoothed back.  I like the wrinkles/cracks - gives them character :) This is the best part about having kids help - it's hilarious and adorable to see little tiny thumb prints (sometimes 2 or 3) in these cookies.

Chill in the fridge for at least 2 hours and up to overnight.

When the dough is completely chilled and you're ready to bake, preheat oven to 350 degrees.  Take the dough out and make sure each cookie has about 2" of clearance from other cookies, either baking in a few batches or on separate baking sheets.  These will spread slightly but less so after chilling.  A silicone mat (as opposed to parchment paper) will also help keep these from spreading too much.

You can spoon 1/2 teaspoonfuls into each imprint.  I like using a piping bag or just a plastic sandwich bag to keep them clean.  Put the jam in the bag, snip a small corner off and pipe the jam into each indentation.  Bake for 12-15 minutes - make sure your oven temperature is right, you don't want these to brown.

Keeps in an airtight container in the fridge for a week but I bet anything they won't last that long.

Thursday, June 12, 2014

Strawberry Oatmeal Bars

These are dangerously easy to make - like 5-10 minutes to put together and stick in the oven.  They are equally dangerous to have sitting on my kitchen counter.  I made 2 pans of these in the past week.  GAH.  The first batch was made w/ a mish-mash of fruit preserves in my fridge I needed to get rid of.  Which, getting a picture of those would've been like spotting Bigfoot - they were gone.  Does anyone remember/love Harry and the Hendersons?  Aww.

Strawberry and raspberry are tied for favorite, blackberry is a close second (only because those damn seeds get stuck in my teeth).

I use a food processor which takes maybe 5 minutes from start to putting the pan in the oven.  I should probably rethink using that method and cut the butter in by hand to avoid the temptation of making these so often.  But they just go down so smoothly as a dessert w/ (decaf) coffee or as an indulgent bfast.  Definitely sub in whatever fruit preserves you have on hand.  

Strawberry Oatmeal Bars
adapted from this Pioneer Woman recipe
8" or 9" square pan
makes 16 small bars
* If you are using fruit preserves out of your fridge, you may want to take the jar out and let it come to room temp or microwave for 30 seconds so it's a little easier to spread 

1/2 c cold butter, diced (yes, that's one stick)
1 c rolled oats (not quick cooking!)
3/4 c AP flour
1/3 c brown sugar, packed
1/2 tsp baking powder
1/4 tsp salt
2/3 to 1 c strawberry preserves (or whatever flavor tickles your fancy)

cooking spray

Preheat oven to 350 degrees and spray your pan with cooking spray or grease.  

Throw everything in a food processor and pulse a few times until blended, maybe for 10-15 seconds max.  There will be large, pea-sized pieces of butter, calm down, it'll all be ok!  The mixture is going to look very loose but I promise everything they'll turn out great.  If it makes you feel better, pulse a few more times until it's a little more blended.  

Scoop out 1/2 the mixture and layer on the bottom of the pan.  Distribute the preserves as evenly as possible on top of flour/butter mixture.  Sprinkle the rest of the flour mixture as evenly as possible on top of the preserves and bake for 40 minutes. 

The texture..I can't.  I just can't.

The first time I made these I was really freaked out it would be pulling a pan full of loose flour out of the oven but the butter and preserves are going to pull everything together.  As stated above, you can always nuke the jar in the microwave (sans lid people) for 30 seconds to loosen them up before spreading.  

Monday, October 21, 2013

Momma Sally's Brownies

This post is going to be short and sweet - just like Momma Sally, Gabe's wonderful grandmother!  She grew up in the Midwest meaning she's genetically predisposed to having the cooking gene.  She's also a fantastic gardener, brilliant storyteller, devout churchgoer and an all around amazing matriarch to this family.  
Isn't she adorable??


Don't let that sweet exterior fool you though, she's tough as nails and fiercely independent.  Even though we aren't related by blood, I think of her as my own grandmother - the last living grandparent I have.  Thanks for being such a wonderful person and example for the rest of us, Sal.  xoxoxo

These brownies are awesome.  Very simple ingredients and a great brownie comes out of the oven every time.  Excellent basic recipe that I like to throw lots of different things in to and see how badly I can annoy Gabe.


Probably Gabe's biggest annoyance factor - nuts!


Momma Sally's Famous Brownies

makes 1 8x8" or 9x9" pan - could be considered a single serving size if one tries hard enough

2 sq (2 oz) unsweetened baking chocolate (found in the baking aisle)
1 stick butter (1/2 cup)
1 c sugar
2 eggs
1/2 c flour
1 tsp vanilla extract
pinch of salt

Preheat oven at 350 degrees.  Melt chocolate and butter together, either in the microwave (for 30 second intervals, stirring between) or over a double boiler until just melted. Set aside to cool slightly.

First add the sugar to the chocolate mixture, then vanilla, salt, eggs, and finally the flour, stirring only enough to incorporate the flour.  Do not over beat.

Bake at 350, for 25-30 minutes. The edges should be pulling away, and the top of the center of the brownies be a little springy then you gently tap with your finger. You can also test by inserting a knife in the middle.

Notes: 

Of course I couldn't leave well enough alone.  Sometimes I knock down the sugar to about 1/2 c if I know I'll be adding in another sweet ingredient.  I've lessened the flour as well to make a more fudgy brownie.  Play with it and make it your own!

You can also try some different combinations of the below.  Most on this list would annoy Gabe.. 


Saturday, August 3, 2013

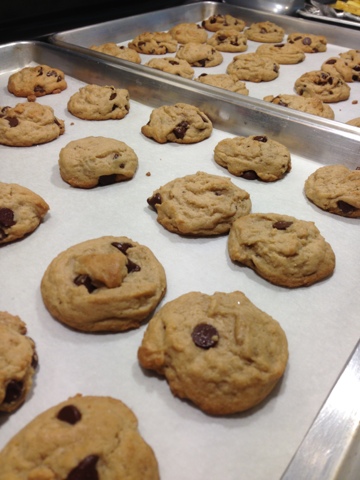
The Last Chocolate Chip Cookie Recipe You'll Ever Need For the Rest of Your Life

I know. I have a flair for the dramatic when it comes to food.  Before I get in to the recipe, let me qualify this by saying I've eating and made a LOT of chocolate chip cookies in my day.  This is by far THE best chocolate chip cookie I've ever made and I use it for everything.  It's got the chewy texture, loads of chocolate chips and that addictive salty edge that makes everything taste just a tiny bit better. 


Seems like the salt-in-desserts kick has definitely taken the food world these last few years by storm (salted caramel ice cream, cake pops, Seattle's own oh-so-famous salted caramel chocolates even the President can't get enough of, etc.). I get the finely ground stuff from my faaaaavorite wholesale store which works really well. I made these cookies for a few years and while amazing, I was always finding I'd eat the cookies top-side down so I could get that salty kick first - but nobody eats cookies like that. So I decided to sprinkle a little salt underneath the cookie dough and on top.

Mind.  Blown.

And now I don't have to get those weird semi-polite looks from people when I tell them they should eat the cookie upside down which invariably had people thinking I was asking them to head stand or find some damn monkey bars so they could hang upside down to eat this cookie. 


Sea Salt Chocolate Chip Cookies

heavily adapted from this recipe

Makes about 5 dozen small cookies

2 sticks butter, unsalted & room temperature

¼ cup granulated sugar

¼ cup turbinado sugar (Sugar in the Raw)

1½ cup brown sugar

2 eggs

1 tbsp vanilla extract

1½ tsp. baking soda

½ tsp. salt

3½ cups all-purpose flour

1½ c. chocolate chips

Sea salt

Preheat the oven to 350ºF.
Cream butter and sugars together until the butter is light and fluffy - pale yellow, scrape down the bowl and mix a few more times.  One ingredient at a time, add eggs, vanilla, baking soda and salt, scrape down bowl and keep mixing.  If you're using a stand mixer, turn the mixer to the lowest speed and add the flour in a cup at a time until just combined.  Don't over mix the dough or you'll get a tough cookie.  After all the flour is incorporated, fold in the chocolate chips.  Sometimes it's helpful to switch to the dough hook so you don't break up all the chips while they're mixing - or just fold in with a spatula by hand and count it as your workout for the day.  Remember though, don't over mix!

Dough is done. 

Sprinkle a tiny pinch of salt where you plan on placing your cookies on the baking sheet.  I do this step all at once, just make a little grid on the baking sheet in a 4 x 5 pattern leaving about 3" between each sprinkling of salt.  Scoop mounds of cookie dough on each pinch of salt.  The recipe makes about 5 dozen cookies if you use the small version of this scoop - leave them mounded, they will spread and flatten during baking. 

Place the dough about 2" apart and you can usually get about 20 cookies per half sheet pan.  Depending on your oven, bake for approximately 11-13 minutes.  Remove from oven and transfer to a cooling rack for at least 20-30 minutes if you can wait that long. 

Tips:

They may seem slightly under done when you take them out and maybe just the slightest bit golden on a few edges but definitely not browned.  This way, when they cool they'll have that yummy chewy texture.

These cookies are also a great do-ahead recipe.  I almost always have these cookies ready to bake from a frozen state so if you're going that route, use a 1½" cookie scoop to dish out on to a parchment sheet lined baking sheet and freeze them.  They pop off the sheet and go in to a ziplock bag and store for weeks in the freezer.  You can just take however many you need and bake off.  I usually set the oven at 360ºF and bake for an extra minute or two from a frozen state.

"Sometimes you feel like a nut."  And when you do, add in a cup of chopped walnuts when you're mixing in the chocolate chips.  I'm married to a no-nut-in-desserts person.  Grrr.

Thursday, April 29, 2010

Quinoa Pudding w/ Strawberries

Has quinoa become the next big thing? I kept hearing more and more things about it. Curiosity finally got the best of me and I decided to get a cup at Top which happens to have a super bulk food section. Then the quinoa proceeded to sit in my pantry for 2 months.

Normally, I don't associate quinoa as a sweet dish. I've only ever seen it prepared as a savory side dish so of course, nothing would motivate me more than hearing about some creamy dessert w/ quinoa.

Isn't it pretty? You can cook it up like rice too - 1:2 ratio. I cooked it in the rice cooker and it came out beautifully.

For this, you'll need 1 c. quinoa.

Then the good stuff. 1 c. heavy cream.

Add that to 3 cups of milk. I used 2%. In fact, I always use 2% milk when cooking and baking.

Whisk together and bring to a simmer.

While that's coming up to temperature, get your vanilla bean and split & scrape the pod.

With the back of the knife, folks. Don't learn the hard way like me.

Mix them into the milk mixture. Throw the emptied pod in there too for good measure.
Then some of the sweet stuff. Just a 1/4 c.

Then take your 1 c. strawberries and slice.
And add about 1 tbsp. sugar, mix. Let them start getting all yummy.
Macerating. That's the technical term for it. Thank you Food Network.
When the cream mixture comes to a simmer, whisk in your quinoa.

Now be patient. This stuff needs to lightly simmer for about 30 minutes.
And you need to stir occasionally.
Look at those pretty vanilla bean seeds. I love them.
After about 30 minutes, your strawberries will have made this lovely syrup.


30 minutes later, you'll get a tapioca like result. Only more healthy than tapioca. I imagine there's a good amount of protein in quinoa compared to tapioca.
Fish out your pod. Nobody wants to eat that.

Portion into 5-6 half cup portions. Sprinkle w/ macerated strawberries.
Quinoa Pudding with Strawberries

I had to try this recipe from this awesome blog
Hope you try it!

Monday, April 5, 2010

Almond Blueberry Lavender Lemon Biscotti

Back in the day (almost a decade, yikes) I worked as a barista for Starbucks. I can still vividly remember the 4:15a alarm clock trying desperately to keep me on time to punch in at 5a. Carrie, my roommate and later bridesmaid slept through the alarm, luckily. That or she was too polite to let on it woke and annoyed her.

I'd get ready and drive to work (half asleep Asian woman driver, very dangerous), it was only about 7 minutes away, I timed it. Those busy mornings (brace yourself, this is cheesy) were some of the best times of my life. No mortgage, no responsibilities, nothing.

Here's a picture of Tien and me at our store. Geez Tien, go wash your apron. Haha, she hates me.

Biscotti always remind me of that time. We had these big glass jars full of vanilla almond and chocolate hazelnut biscotti. After I found a great biscotti recipe I changed it a little to use ingredients I had in my pantry and the result?

Almond Blueberry Lavender Lemon Biscotti.

They're awesome, the lavender and lemon combo really work well together. Seriously though, someone please find a shorter name for these.

Ready? Let's roll.

Start w/ my favorite ingredient: butter. One stick (i.e., 1/4 lb. or 1/2 c. - I think I finally have it now) at room temperature.

I used my stand mixer but you can use a hand mixer or just do it by hand and skip the gym that day. Cream the mixture w/ 3/4 c. of sugar. The only reason I deviated from the full cup in the original recipe was simply b/c that's all we had left. It's embarrassing to admit you went through the whole 10 lb. bag of sugar you got from Costco.

Forget I just said that. Moving on, lemon zest.
Zest of one lemon. Smells like summer to me. Add to the butter an let it go for a sec.

Scrape down the butter/sugar mixture.
Look at all that sugar on the side of the bowl. It needs to socialize w/ everyone else.
Eggs. Original recipe calls for two eggs. You can probably get by w/ just two eggs in this recipe too. It just wasn't written clearly that the last egg white is only for the egg wash. So I just dumped an extra egg in, what the heck. I get eggs from Costco too.
Add them in one at a time and scrape down again (w/ your personalized spatula - ok, promise that's the last time I bring that up).
Then add your flour. 2 c. of the fluffy white stuff.
1 tsp. of each of these characters. You can use almond extract too. I thought of that too late.
Then you get this pretty wet dough.
2/3 c. raw almonds.
1/2 c. dried blueberries, all purchased at my favorite place to shop, Costco.
Mmmm. Why don't I use these more?

All the kids in the pool.
Then, my true stroke of genius: lavender. Just a tsp. please, it's very strong.
Fold all the aforementioned things into the dough. Here's also where you can get creative - dried currants, apricots, dates, peanuts, pine nuts, whatever. Try your own nut/fruit combo. Go ahead, I dare you.

See what I mean about being a super wet dough? Flour your hands well or else you'll end up w/ mallet hand.
Form into logs. Give these guys a little room to grow too, they expand while they bake.

Brush w/ egg wash.


Sprinkle w/ coarse sugar, I used raw sugar. You can get that other fancy turbinado sugar. Oh, the pretense.

It sure is pretty.

15-20 minutes later, here you are. A strange looking cookie log.

Then while the logs are still warm (I didn't wait to let them cool) slice these guys up. I guess try first w/ a serrated knife, then if that doesn't work, use a chef's knife.

It didn't make sense to me anyways when I read that other recipe, the almonds are going to be hard to cut through. I need to write Anne Burrell.

Ok, lay flat and bake again. I had to bake mine for about 20-25 minutes to see any golden brown action.

But then they were. And the seas parted and Moses said.. Oh, wait. NM.

While these were still warm I poured myself a cup of tea and had a nice little break to sit back and admire the handy work.
Check out that blueberry!
Almond Blueberry Lavender Lemon Biscotti

adapted from this Anne Burrell recipe

makes about 20 biscotti

1 stick butter, room temp (about 1/2 cup or 1/4 lb.)
3/4 c. sugar
3 eggs
2 tsp. lemon zest (about the zest of 1 lemon)
1 tsp. baking powder
1 tsp. vanilla extract (almond would work well too)
2 . AP flour
2/3 c. whole almonds
1/2 c. dried blueberries
1 tsp. dried lavender
1 egg white
2 tbsp. Sugar in the Raw

Preheat oven to 300 degrees. Cream butter and sugar until light & fluffy in a stand mixer. Meanwhile, zest lemon and add to the butter mixture. Scrape down the sides of the bowl and put the mixer on low speed. Crack in one egg at a time until combined - scrape down in between egg additions. Add vanilla extract, flour and baking powder until combined. Fold in almonds, blueberries and lavender - make sure to fold in by hand so almonds and blueberries stay whole and in tact.
Divide the dough in half. The dough will be fairly sticky so flour your hands and form into a log. I used a half sheet baking pan and the log ran about 2 inches shy on each side of reaching the edge of the pan. Separate an egg and mix the white w/ about 1 tbsp. water and brush the tops of each log. Sprinkle w/ coarse sugar.

Bake for 15-20 minutes until set and cooked through, it won't be browned but that's ok. And if you really have a problem w/ it, just bake it for 25 minutes. While warm, remove logs to cutting surface and cut logs on the bias at about 3/4" thickness. I had to cut with a chef's knife (instead of the serrated knife the recipe recommended) since my biscotti were crumbling pretty bad when I got to the almonds. Lay flat (either cut side down) and bake for another 20-25 minutes or until lightly golden.

Remove and place on a cooling rack until completely cooled before storage in an airtight container.